Creating an Internal Actor
- From the SmartSolve Portal Page, click the Admin tab.
- In the User Management menu, click Users.
Result: The Internal Actors window is displayed. - Right click and select Add.
Result: The Internal Actor entry window is displayed.
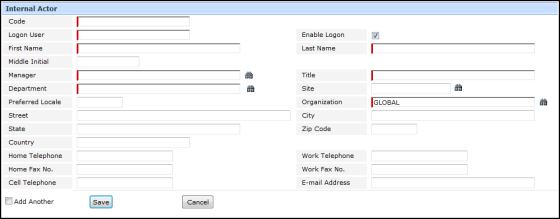
- Enter the information in the following fields:
| Field | Description |
|---|---|
|
Code* |
The code is a unique field that identifies the actor. Most Pilgrim customers populate this field with the actor’s first initial/last name or last name/first initial. |
| Logon User* |
If the actor will be logging into the system, this is the logon ID used by the actor to log into the application. Ensure the logon user entry exactly matches the user ID entered in the user account on your server. Passwords do not need to be set up as the application uses the password from the user's account on the server. |
|
Enable Logon* |
Check this checkbox to allow the actor to log into the application with a valid user ID. |
|
First and Last Name, Middle Initial* |
Enter the first and last name of the actor. This information will be used for searching. |
|
Manager* |
This field is used for escalation and also for SmartTrain™. It is used as a method to search for actors. Use the DEFAULT actor as the manager, if needed, until you add all actors or configure your actor list using your org chart. |
|
Title* |
Enter the title of this actor, basically the role that this actor plays within the organization. This information is entered for identification. |
|
Site |
Enter or zoom to select the site at which the user will be located. |
|
Department* |
This field is used for escalation and for restrict org unit security. It is also used to search for actors. |
|
Email Address |
Enter the contact’s email address in this field if you want your client contact to be notified by email of items that need to be completed. |
|
Address Info |
Enter additional contact address information. |
|
Preferred Locale |
If you have set up the system to translate SmartSolve using languages other than English and your contact will be logging into the system, please refer to the Translating Field Names section in the Designer Tools Help System. |
- Click the Save button.
Result: The new internal actor has been added and the Detail of the actor is displayed. The following default tabs are available in the actor record:
| Tab | Description |
|---|---|
|
Detail |
The Detail folder contains all of the details about the actor's login, title, and phone information. |
| Role |
Roles are assigned to actors if they will be logging into the application or if you are using them as placeholders in records, such as investigators and approvers. See Attaching Multiple Roles to a Single User. |
|
Rights Groups |
Rights groups are assigned to actors if they will be logging into the application, such as investigators and approvers. See Attaching Multiple Rights Groups to a Single User. |
|
Rights |
This is a read only folder used by the administrator to quickly verify if the actor has the correct right or is missing a right to perform a function. The rights in this folder are populated when rights groups are added. |
|
Group |
This is a read only folder used by the administrator to quickly view how many approval or review groups this actor has been added to. |
|
Address Info |
This folder is used to modify the actor’s address information. |
|
Training Requirements |
This folder is used for SmartDoc and SmartTrain. |
See Also
Deactivating an Internal Actor
Reactivating an Internal Actor
Attaching a User to Multiple Roles
Removing Multiple Roles from a User
Attaching a User to Multiple Rights Groups
Removing Multiple Rights Groups from a User
Creating Persons in the SmartTrain Admin Guide